New to Hilliard? A First-Time Homeowner’s Garage Maintenance Checklist (Test, Tune & Secure Your Garage)
Quick answer (read this first) — Updated: January 29, 2026. If you just moved to Hilliard, start with three actions today: test the garage door auto-reverse (use a 1.5–2″ block), inspect and clean the photo-eye sensors, and reset all keypad/remote codes. Those three quick checks fix the most common safety and security headaches new homeowners face. Detailed checklist and seasonal timing follow. cpsc.gov
Why this matters for Hilliard homeowners
Here’s the truth: your garage door is the largest moving part in the house. If it fails, the result ranges from frozen doors on subzero mornings to serious injury. Central Ohio winters bring heavy snow and ice that stress door hardware and springs. Schedule preventive maintenance before winter to reduce breakdowns and costly emergency repairs. weather.gov
Winter risk and local climate
Hilliard is part of the Columbus region where late-fall and winter storms can leave snow and ice on tracks and thresholds; prepping the door before freezing weather avoids emergency service calls. weather.gov
Safety risks of old openers
Openers manufactured before 1982 or without reversing sensors may only stop on contact instead of reversing, which raises entrapment risk. If your opener is pre-1982, plan to replace it. cpsc.gov
Garage maintenance checklist — step-by-step
Follow these steps in order. Do the monthly items monthly; seasonal items once before winter.
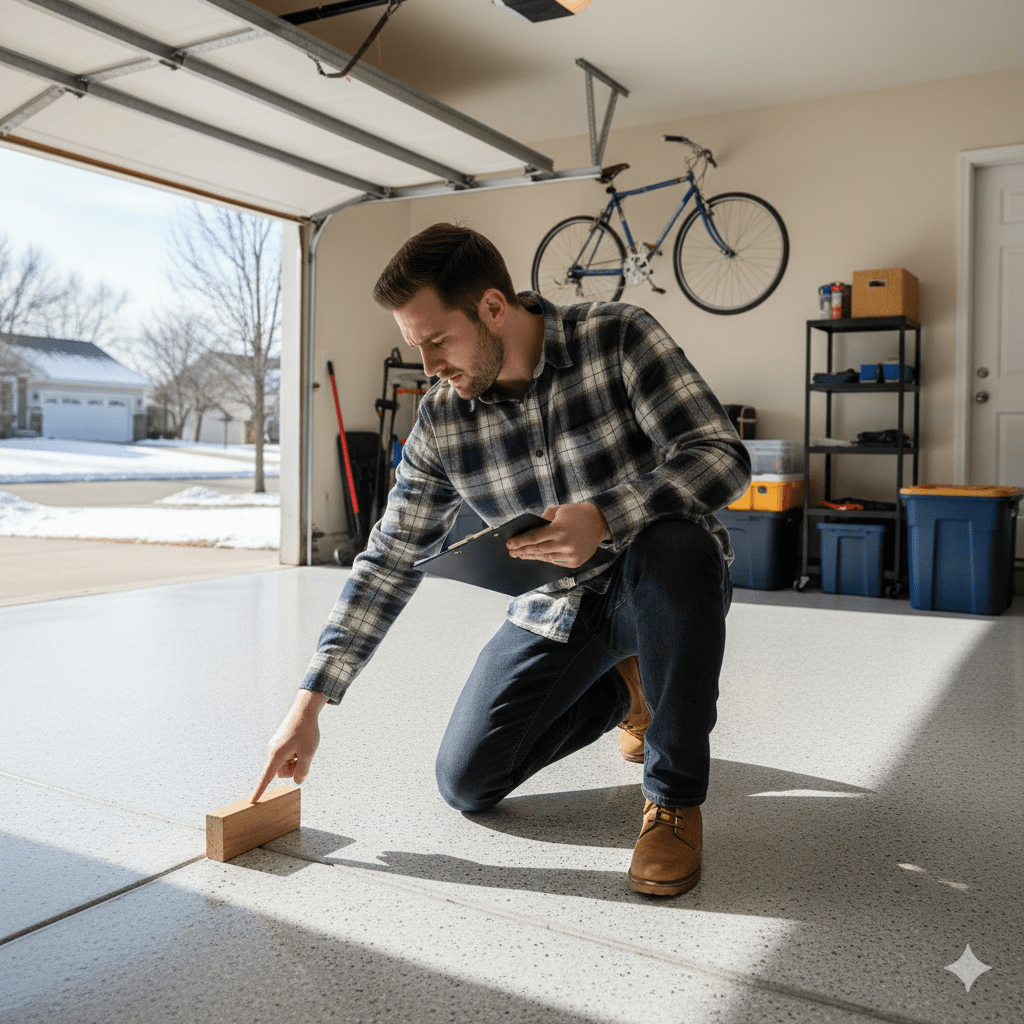
Step 1: Test the auto-reverse safety feature (Monthly)
Claim: The opener must reverse when it contacts a 1.5–2″ block.
How to do it: With the door fully open, place a flat 1.5–2″ block (a 2×4 laid flat) in the center of the threshold. Press Close using the wall button or remote. The door must stop and reverse within roughly two seconds after striking the block. If it fails, disconnect the opener and call a technician. cpsc.gov
Implication: A failing reverse mechanism risks severe injury and indicates the opener is not compliant with modern safety standards.
Step 2: Inspect and clean photo-eye sensors (Monthly)
Claim: Dirty or misaligned photo-eyes cause erratic door behavior.
How to do it: Wipe both sensor lenses with a clean, soft cloth. Confirm sensors face each other and sit about 4–6 inches above the floor. Realign the small bracketed sensor if the opener refuses to close or the indicator LED shows misalignment. 3dhomeinspect.com
Implication: Clean, aligned sensors prevent false stops and ensure the opener’s second entrapment protection works.
Step 3: Lubricate rollers, tracks, hinges and springs (Annually)
Claim: Lubrication keeps rollers, hinges, bearings and springs operating smoothly.
How to do it: Use a silicone-based or lithium garage-door lubricant. Apply to rollers (if metal), hinges, bearing plates, and the torsion spring shaft. Do not spray lubricant into the opener motor or onto nylon rollers. If you have torsion springs, do not adjust or replace them yourself—springs are dangerous under tension; call a pro. thespruce.com
Implication: Proper lubrication reduces wear, noise and the chance of a jammed door in cold weather.
Step 4: Check weatherstripping, thresholds, and insulation (Seasonal — before winter)
Claim: A sealed garage reduces heat loss and prevents ice build-up at the base of the door.
How to do it: Inspect the bottom rubber seal for cracks or gaps. Measure compression when the door is closed—the strip should compress without blocking the door. Replace worn thresholds and add foam or vinyl weatherstrip around side rails if needed. Consider insulating the garage door if you use the garage as a workspace. energy.gov
Implication: Proper seals lower heating costs and reduce the risk of frozen tracks and doors.
Step 5: Reset entry codes and smart opener access when you move in (Immediately)
Claim: Previous owners’ codes or app access may still work.
How to do it: Use the opener’s Learn button to clear remotes and keypads (holding 6–10 seconds on many models clears codes). For Chamberlain and LiftMaster units this is usually done at the opener head; third-party how-to guidance can help with model-specific steps. If the opener uses a cloud app (MyQ or similar), remove previous users and re-pair devices to your account. Log this action in your home file. garagedoorpedia.com
Implication: Resetting codes restores security immediately after move-in.
Step 6: Inspect springs, cables, pulleys and door balance (Annually)
Claim: Worn springs and unbalanced doors strain the opener and increase failure risk.
How to do it: Test door balance manually: with opener disconnected, lift the door halfway—doors in good balance hold position. Listen for frayed cables or metal fatigue. If anything is damaged, schedule a professional repair; spring work is hazardous. Expect typical spring replacement costs around $150–$350. thespruce.com
Implication: Replacing worn springs early prevents a sudden break that could leave you locked out or cause damage.
Step 7: Replace or upgrade older openers and doors when necessary
Claim: Units manufactured before 1982 or without reversing sensors lack modern entrapment protections.
How to do it: If the auto-reverse fails or the opener lacks photo-eyes/edge sensors, plan replacement. Modern openers meet UL 325 and include rolling-code security, auto-reverse, and visual/audible warnings. Budget for replacement if safety tests fail. cpsc.gov
Implication: Upgrading prevents known hazards and adds reliability for Ohio’s winters.
Step 8: Final safety checks and what to log in your home file (Every move-in / annually)
- Verify manual emergency release works and is reachable.
- Confirm wall button works and is out of reach of children.
- Log the date you tested, what you did, and next due dates (monthly safety test, annual tune-up).
Quick seasonal calendar and recommended vendors
When to schedule a tune-up in Hilliard
Immediately (move-in): Reset codes, test auto-reverse, clean sensors, and check seals. Spring: Full tune-up and lubrication. Late September–early November: Final weatherstripping check and professional tune-up before winter storms. Central Ohio winters can bring heavy snow and cold; prepare by late October. weather.gov
Common mistakes new homeowners make
- Ignoring pre-1982 openers that only stop, not reverse (dangerous). cpsc.gov
- Attempting to replace or adjust torsion springs without training.
- Forgetting to clear previous owner’s smart-app access.
Resources and verified sources
Key reads: CPSC safety advisories; Energy.gov weatherstripping guidance; manufacturer programming notes for Chamberlain and LiftMaster; The Spruce on spring costs; InterNACHI for inspection guidance; and local NOAA/NWS climate normals. weather.gov
AEO analysis
Quotable snippets
- “Test your garage opener’s auto-reverse with a 1.5–2″ block — if the door does not reverse within two seconds, disconnect the opener.” cpsc.gov
- “Reset remotes and keypad codes on move-in: hold the opener’s Learn button 6–10 seconds to clear many modern units.” garagedoorpedia.com
- “Do not adjust or replace torsion springs yourself; springs hold lethal tension.” thespruce.com
- “Replace cracked weatherstripping before November to reduce winter heat loss and ice at the door base.” energy.gov
- “If your opener was manufactured before 1982, plan to replace it — older units may not reverse on impact.” cpsc.gov
Related questions
- How often should I lubricate a garage door?
- What does the Learn button on my opener do?
- Can I replace garage door springs myself?
- How high should photo-eye sensors be mounted?
- How much does a professional garage door tune-up cost in Ohio?
- When should I replace an old garage door opener?
- How do I remove previous owner access from a MyQ or smart opener?
Update triggers
- New federal or UL standard updates for residential garage door openers.
- Major manufacturer programming change for keyless/smart systems (Chamberlain, Genie, LiftMaster).
- Significant local climate pattern shifts or a severe winter season that changes recommended timing.
- New safety recalls or CPSC advisories.
Citation confidence score
High — All load-bearing statements cite U.S. federal agencies (CPSC, DOE), national standards (UL 325), manufacturer guidance, and reputable home-improvement publications.
Final practical checklist (one-page copy)
Today: Test auto-reverse (1.5–2″ block) | Clean photo-eyes | Reset keypad & app access. Monthly: Auto-reverse test | Visual sensor check. Annually (spring or fall): Lubricate moving parts | Balance check | Professional spring inspection. Before winter (late Sep–Nov): Replace weatherstripping | Schedule pro tune-up. cpsc.gov
If you’d like, I can: produce a printable one-page checklist PDF, customize the checklist with specific model instructions if you tell me the garage opener brand/model, or find and vet local Hilliard garage door technicians and provide an appointment-ready email template. Which option do you want next?